Photo by Jiri Hodan
http://www.publicdomainpictures.net/view-image.php?image=20681&picture=wassertropfen-auf-gras
http://www.publicdomainpictures.net/view-image.php?image=20681&picture=wassertropfen-auf-gras
Tell Me About
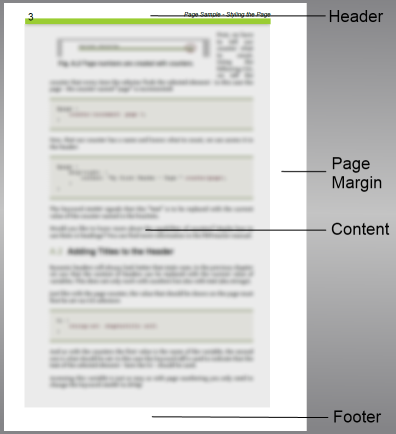
The most important part of styling the pages of a document - apart from the actual size of the pages - are headers and footers. Here we expect to find at least page numbers.
But before numbering our pages let's have a quick look on how to create just a simple text that can be found on top of every page of our document.
To set a header, use the following CSS:
@page {
    @top-right {
        content: "My first Header";
    }
}
And here is how you set a footer:
@page {
    @bottom-right {
        content: "My first Footer";
    }
}
That wasn't very difficult, right? By using the @page selector, we can apply styles to pages rather than elements. Let's take a closer look at pages now.
The CSS above creates a text in the top right corner of every page in our document. The text can be styled with further CSS properties, for example font-size or color.
Creating a page footer works just the same way but with the keyword "bottom" instead of top.
We can also use other CSS properties to style the page margin box - in this case the header - and give it a more appealing look. For example, we can use border-bottom to draw a line between content and header. This is also done in this document to create the thick green line.
The most common use case of headers and footers is page numbering. In order to display the page numbers we use counters.

First, we have to tell our counter what to count. Since we just want to count pages we can use the pre-defined counter "page".
Now that our counter has a name and knows what to count, we can access it in the header:
@page {
    @top-right: {
        content: "My first Header - Page " counter(page);
    }
}
The keyword counter signals that this "text" is to be replaced with the current value of the counter named in the brackets.
Would you like to know more about the capabilities of counters? Maybe how to use them in headings? You can find more information in the PDFreactor manual.
Dynamic headers will always look better than static ones. In the previous chapter we saw that the content of headers can be replaced with the current value of variables. This does not only work with numbers but also with text (aka strings).
Just like with the page counter, the value that should be shown on the page must first be set via CSS selectors:
h1 {
    string-set: chaptertitle self;
}
And as with the counters the first value is the name of the variable, the second one is what should be set. In this case the keyword self is used to indicate that the text of the selected element - here the h1 - should be used.
Accessing this variable is just as easy as with page numbering you only need to change the keyword counter to string:
@page {
    @top-left: {
        content: "Chapter " string(chaptertitle);
    }
}
With this CSS rule, we now have a short text and the title of the last heading at the top left corner of each page.
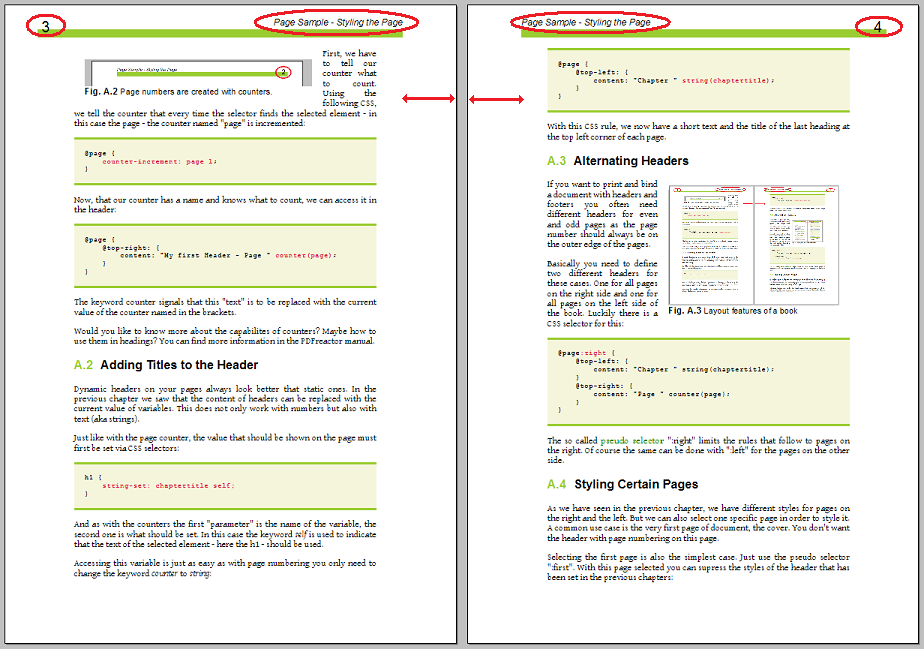
If you want to print and bind a document with headers and footers you often need different headers for even and odd pages, as the page number should always be on the outer edge of the pages.
Basically, you need to define two different headers for these cases. One for all pages on the right side and one for all pages on the left side of the book. Luckily there is a CSS selector for this:
@page:right {
    @top-left: {
        content: "Chapter " string(chaptertitle);
    }
    @top-right: {
        content: "Page " counter(page);
    }
}
The so called pseudo selector ":right" limits the rules that follow to pages on the right. Of course the same can be done with ":left" for the pages on the other side.
As we have seen in the previous chapter, we have different styles for pages on the right and the left. But we can also select one specific page in order to style it. A common use case is the very first page of document, the cover. You don't want the header with page numbering on this page.
Selecting the first page is also the simplest case. Just use the pseudo selector ":first". With this page selected you can suppress the styles of the header that has been set in the previous chapters:
@page:first {
    @top-left: {
        content: none;
    }
    @top-right: {
        content: none;
    }
}
In addition to the first page you can also style the last page of the document. A common use case for this is if you want to add a disclaimer to the end of the document. The disclaimer would replace the normal footer while also being much bigger. To select the last page use the selector ":-ro-last".
@page:-ro-last {
    margin-bottom: 6cm;

    @bottom-left {
        content: "This is the disclaimer text.";
    }
}
But what if you want to select a certain page somewhere in the middle of your document? For this case you have two options: You can select the nth page (e.g. the second page) or you can use named pages. You can give the page a name and then select it via CSS.
Selecting a certain page number is quite straight forward using the ":-ro-nth" selector with the page number:
page:-ro-nth(2) {
    size: A4 landscape;
}
Naming a page is done by its content. The naming element causes a page break and gives its page the defined name:
table.wide {
    page: landscape;
}
In this case "landscape" is the name the page with this table is going to have.
@page landscape {
    size: A4 landscape;
}
What we have now is that all tables of the class "wide" are now on pages that have been rotated by 90 degrees so that our wide table has much more room to the sides.
Another common use case are special page styles for the beginning of chapters. Maybe you do not want to display headers and footers on such pages or you want different margins. In this case, you can use page groups. To define page groups, surround each chapter with a container element and place these containers on named pages. Each container represents a page group and you can select an arbitrary page of each group using the ":-ro-nth(n of chapter)" selector.
The following example removes the header on the first page of each chapter:
section {
    page: chapter;
}

@page:-ro-nth(1 of chapter) {
    @top-left {
        content: none;
    }
}
Important: For page groups to work, the container elements for each chapter must be separated by a forced page break.
The following table gives you an overview over some selectors and their use cases.
You can find more information on how to select page margin boxes in the PDFreactor manual.
| Selector | What is Selected | Common Use Cases |
|---|---|---|
| @page | All pages of the document (not their content) | Setting the page size, setting up a page counter, setting styles like a border on the top. |
| @page:first | The very first page of the document | Disabling styles for the cover page, setting specific styles for the first page, e.g. background-color |
| @page:-ro-last | The very last page of the document | Adding a disclaimer to the end of the document |
| @page:right/:left | Selecting all pages on the right/left | Swapping the side of the page numbering depending on the page (for printing and binding books) |
| @page:-ro-nth(n) | The nth page of the document | Applying special styles to arbitrary pages, e.g. for a preface in a book. |
| @page name | Select all pages containing elements with the CSS property "page: name" | Rotating a certain page to landscape so a wide table or image may fit, suppressing page header and styling a certain page with background-images |
| @page:-ro-nth(n of name) | Select the nth page of each page group with the given name. | Applying special styles to repeating structires, e.g. the first page of each chapter in a book. |
| @page { @top-left/ @top-center/ @top-right |
Select the margin box on the top left/center/right of the page | Styling the box, adding content like page numbering |
| @page { @right-top/ @right-middle/ @right-bottom |
Select the margin boxes on the right of the page | Styling the header on a landscape page (e.g. using a border. Note that text can not be rotated alone) |
You may have noticed, that on the previous page the table stood alone although there was more than enough space for more content. However, using CSS a page break was enforced.
Enforcing a page break is done with the CSS properties break-before and break-after. In this document for example every chapter begins on its own page.
h1 {
    break-before: page;
}
On the other hand there are cases where you don't want a page break to occur, for example inside a table or code box. In these cases the property break-inside is used.
All these properties can be set to page, avoid-page and auto, the default value. For more information on page breaks, check out the PDFreactor manual.
By default images are not split across pages.
This can be changed via the proprietary CSS property -ro-object-slice.
| Property | What it does | Use Cases |
|---|---|---|
| break-before:page | The element is always on a new page | Title of new chapter, element on landscape page, big elements e.g. images |
| break-before:avoid-page | The element is not on the top of a new page (if avoidable) | Table with a short description right above it |
| break-after:page | The following element is always on a new page | element (e.g. big table) on landscape page |
| break-after:avoid-page | If a page break would occur after this element, it is put on the next page instead. | Two elements belonging together like a image and a description. |
| break-inside:avoid-page | If a page break would occur inside this element, put it on the next page instead. | table that should not have a page break, a code box, table cells |
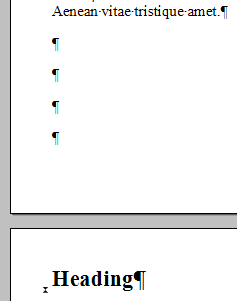
There can be situations where the line of a paragraph does not fit on a page anymore and it is moved onto the next page - all alone. Poor little line. Fortunately this can be prevented.
If a lonely line is on the next page it is called a widow. If all other lines are on the next page, the line that has been left behind is referred to as an orphan.
Setting the minimum number of lines that may be alone on a page is done with CSS. The following CSS shows the default settings of PDFreactor for orphans and widows:
p {
    orphans: 2;
    widows: 2;
}
Changing the value to one will allow orphans and widows. Changing it to higher values will prevent even multiple line widows and orphans.
Whenever a page break occurs within a table, running headers come in handy. On each page the table header is repeated at the top.
In order to use running headers, all you have to do is using the following HTML structure when creating the table:
<table>
    <thead>
        <tr>
            <th>
            </th>
        </tr>
    </thead>
    <tbody>
        <tr>
            <td>
            </td>
        </tr>
    </tbody>
</table>
This table would have only one column. For more columns just add more th/td elements. Also note that for every column in the table body there must be at least an empty cell in the table head.